Painting kites
For more results see the NPW page...
The following explanation was provided by Jordi Krello (thanks Jordi!). Click on the banner below for his excellent website.
How to paint ripstop
These days people get more and more offers from company's to be sponsord, a logical cause of such an agreement is to get the logo on your material.
In the old days, we would sew a simple logo on the kite but this is a job which takes up much time and small mistakes causes disruptions in the airflows around your kite and it looks just awefull, so this is a very bad idea if you're not experienced in sewing. Also more complex logo's are not useable for this technique.
 A much more easier, precise and faster method to get the logo onto your kite is by airbrushing it. Airbrushing is a painting technique which uses a mechanical spray gun which uses compressed air to spray paint, due to a very small nozzle you can actually spray very precise.
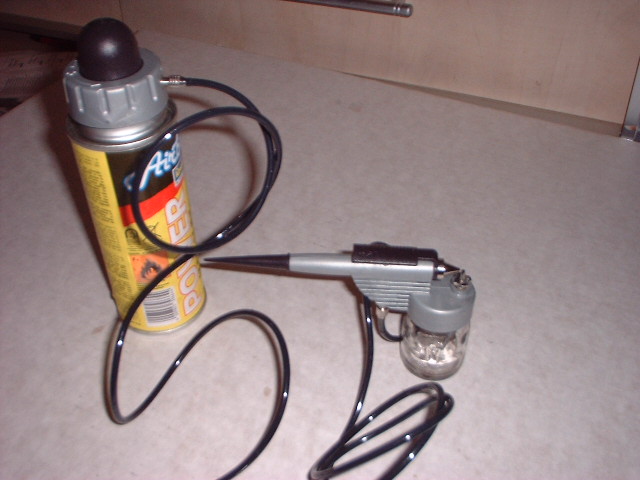
These spray guns can be bought at specialized graphic supply shops, they cost around EURO 100,-. Offcourse this is a ridiculous high price considering you only intend to use it once. You can also search for spray guns which are used for miniature scale painting like small automobiles, trains and stuff. Revell is a well known brand in that terrain and offer a few models which are fairly cheap.

You'll also need air, a compressor is the best but good airbrush compressor (you'll need a very constant airflow so not any compressor is usable), but these are also very expensive, a good alternative are special aircans which are filled with very clean air and deliver a fairly constant pressure, these are very usable and cheap, around EURO 7,-.
Another thing you need is paint, there are several paints on the market, the paint you'll need is Createx, this manufacturer produces paint and additives for almost every surface, this paint is usually only available in specialised graphic supply shops, they in about every color and can be mixed for very special colors.
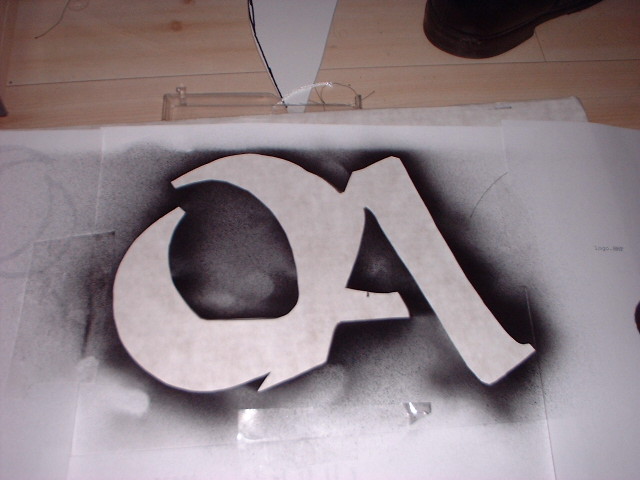
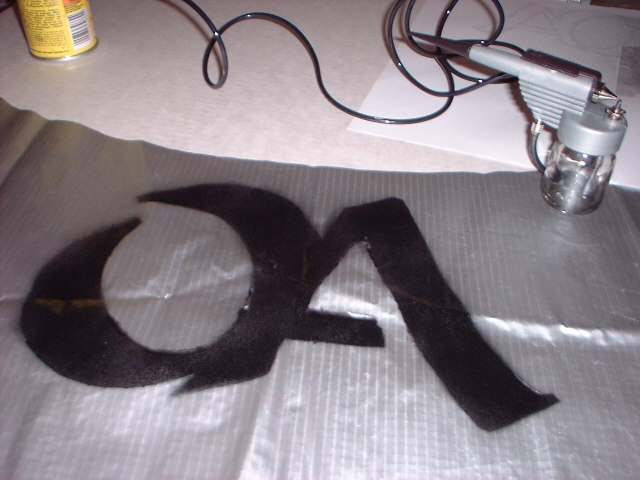
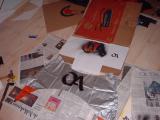 The standard way to spray airbrush is with templates which get stuck on your surface (the sticky plastic kind which can also be used to cover your schoolbooks), these are NOT suitable for kites, the glue on that material can actually damage the coating on your kite. You need loose templates, which can be cut out of cardboard which is the cheapest method but you can also buy a thick piece of plastic which is much more durable and by static electricity also kind a get stuck on the material which causes to loose the annoying effect when paint is sprayed under the sides of your loose templates.
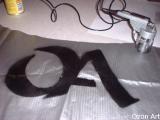
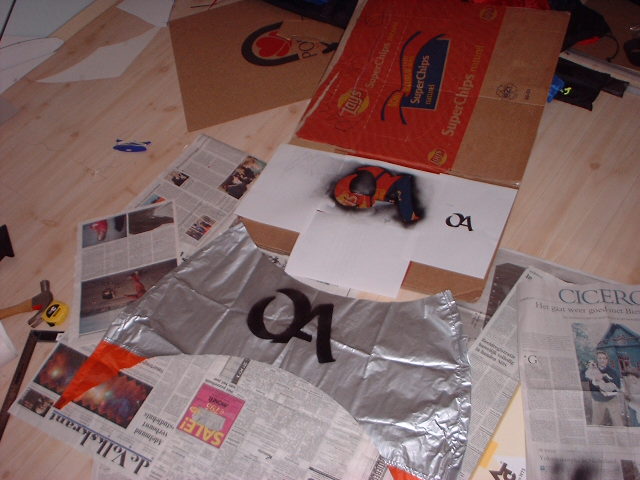
When you apply the different colors start off with the lightest color, with small mistakes the darker color will mask that mistake which will happen in the beginning, it is also advisable to practice on (news)paper, because this technique can be pretty tricky for starters.
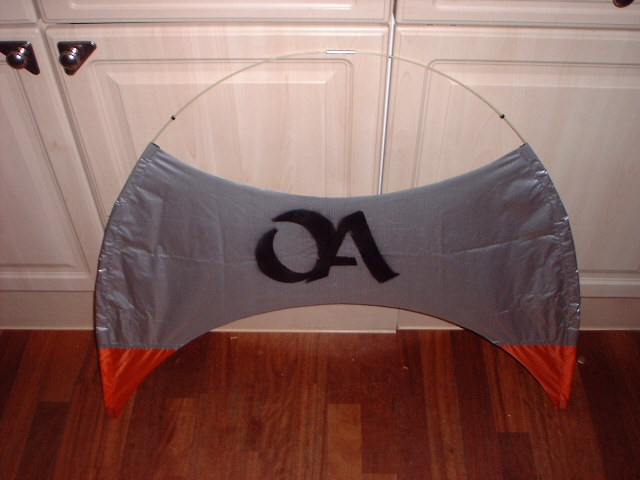
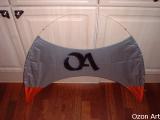
The end result:
good luck to yall.
And in Dutch:
Nu kitesurfing steeds populairder wordt staan de bedrijven in de rij om kiters te sponsoren, een logisch gevolg is dat er een logo op het materiaal moet.
Vroeger zouden we een simpel logo op de vlieger naaien, maar dit werk neemt veel tijd in beslag en met kleine foutjes kun je een vlieger verpesten, dit is dus een slecht idee als je niet echt ervaren bent achter de naaimachine. Ook complexe logo's zijn niet te maken met deze techniek, als laatste is het zo ook niet mogelijk om een logo op een bestaande vlieger te krijgen zoals een foil of een kitesurf tubevlieger.
Een veel makkelijkere, snellere en preciesere manier om een logo op je vlieger te krijgen is door het te aitbrushen. Airbrushing is een schilertechniek waarmee je met behulp van een mechanisch werktuig verf onder hoge druk op de ondergrond spuit, dankzij een heel fijne uitgang kun je zeer smalle lijntjes spuiten maar ook een vrij brede straal. Airbrush apparatuur KAN gekocht worden bij gespecialiseerde grafische winkels zoals Harolds of van Beek in Rotterdam. De prijzen in deze winkels liggen echter vrij hoog omdat het om professionele apparatuur gaat en omdat het hier om waarschijnlijk een eenmalige actie gaat is het verstandiger alternatieven te zoeken. Deze alternatieven zijn bijvoorbeeld te zoeken in de automodel wereld, hier gebruiken ze zogenaamde single action airbrush apparatuur, met name van het merk Revell zijn goedkope modellen te vinden, deze zijn ook zeker wel geschikt om te spuiten op vliegers, je moet alleen niet verwachten dat je hier lijntjes van een mm mee kan spuiten.
Wat heb je nodig. Ten eerste de airbrush, daarnaast nog lucht, als je aan een compressor kunt komen is dat perfect, deze moet echter wel gezuiverde en constante lucht leveren anders word je werk alsnog verpest door onregelmatig verdeelde verf op je vliegers met ook wel luchtbubbels. Een alternatief voor deze dure compressors zijn luchtbussen, deze bussen leveren voor een beperkte tijd prima luchttoevoer, je kan er lang genoeg mee spuiten om een logo op een flinke vlieger te krijgen. Je hebt ook nog mallen nodig, het standaard materiaal is van dat plakplastic, dit is echter niet geschikt voor vliegers omdat het de coating kan verpesten, daarom zullen we losse mallen moeten gebruiken, hier is speciaal plastic voor te verkrijgen wat d.m.v. statische elekriciteit plakt aan het spinnaker (mits goede omstandigheden), dit is wel duurzaam maar ook weer vrij duur, het alternatief is gewoon hardboard of karton, het risico loop je hiermee wel dat je, een lichte gloed verf onder je mallen spuit, hier valt overigens prima mee te leven, het valt niet echt op en is in sommige gevallen zelfs mooier. Als laatste heb je natuurlijk nog verf nodig, deze verf is niet echt goedkoop maar is het enige onderdeel waar niet op word 'bezuinigd', de verf moet namelijk tegen zonlicht en water kunnen. Createx is de verf die je nodig hebt, Createx heeft een ruim assortiment aan kleuren een soorten verf, de standaard verf is geschikt voor ons doel. Gelukkig heb je niet veel van deze verf nodig, airbruhen is een techniek die een dun laagje verf op het oppervlak brengt, dit is tevens erg goed voor het aerodynamische effect op de vlieger.
Je hebt nu de meest essentiele onderdelen, je hebt ook nog water om de boel te reinigen, eventueel een druppelpipetje daarvoor, een bakje/fotorolletje/whatever om eventueel verf te mennen, wat wel handig is is veel krantenpapier, dit heb je nodig om je meubels enz te beschermen tegen de nevel die van je aibrus afkomt en is ook handig als hulpmiddel om de mallen te vergroten, als echt allerlaatste heb je dan ook nog crepetape nodig.
veel succes met je projekt en als je vragen hebt kun je ze altijd mailen naar kitenews@zeelandnet.nl.


 A much more easier, precise and faster method to get the logo onto your kite is by airbrushing it. Airbrushing is a painting technique which uses a mechanical spray gun which uses compressed air to spray paint, due to a very small nozzle you can actually spray very precise.